Natural Light in Landscape Photography - How Can You Use It?
- Dan Edmunds
- Mar 26
- 10 min read
"A good photograph is knowing where to stand." Ansel Adams
He was right. Beyond composition and good camera technique, light can significantly influence an image. Mastering how to utilise the available light is essential in landscape photography, especially when traveling with limited time at a location.
There is both good light and bad light. This post aims to demonstrate that even in less favourable light conditions, all is not lost; you just need to adjust your approach and seek different photographic opportunities. Let's admit it, a landscape photographer probably faces the toughest challenges when it comes to light. The weather is unpredictable and ever-changing, with no two days or even hours being the same! (Although, having worked with children and animals, I know which I’d prefer to contend with!) Regardless of where you are, understanding light is vital for your photography. You must comprehend its limitations, its impact on the image, and how to best utilise it.
Natural light, much like studio lighting, can be direct or diffused. Direct light, as shown in the picture below, creates strong shadows and high levels of colour saturation and intensity in an image. Diffused light, such as on an overcast day, results in softer shadows, less contrast, and a more subdued scene. Both have their advantages and disadvantages, and my experience has taught me how to handle each situation as it arises. I hope this post will at least help you grasp some of the challenges and benefits of different light sources...

Side Lighting (My favourite!)
It's no coincidence that most of my most successful and atmospheric images come from side lighting. Side lighting, particularly at an oblique angle as the sun is close to the horizon is the standout time to capture light at its very best.
This period, known as the "golden hour" - the last hour before sunset or the first hour after sunrise - produces beautifully warm light, softer shadows and those perfect tones for your creations. It's no secret that this is a landscape photographer's favourite time and is the reason you'll find me clinging to cliff edges before the sun has risen and battling the elements as it's approaching dusk. I think it's pretty clear to see why?

Side light is intended to hit the subject at close to 90 degrees. Couple that with our friend the golden hour, and it's clear to see the benefit of this low lighting, with a mixture of strong contrast, elongated shadows, and bold highlights. It presents depth and emphasises texture that is harder to achieve with other light sources.
The images above and below demonstrate all these qualities. From the visible textures and balance of light and shade on the tree trunks above to the emphasis on depth created by the shadows on the pristine sand ripples of Guernsey's La Bette Bay, below.

Backlighting
Probably the most challenging of light to control. Backlighting is when the subject matter is illuminated from behind. In the case of landscape photography, this is a very common scenario when capturing sunsets and sunrises with the sun in full view on the horizon.
It creates an intense and dramatic light source with high contrast between the brightness in the sky and the land or sea that you are framing. Which can be both hugely rewarding and insanely frustrating!
There are two significant challenges to backlighting.
One is the effect of sun glare - artefacts created by the tiniest of dust particles on your lens. Sometimes they simply can't be avoided and can offer a dramatic inclusion to a scene but, more often than not, we want to try and control them. There are ways they can be reduced, though - having clinically clean optics (believe me, this is not easy for an outdoor photographer!), a change in the angle of the scene you are trying to capture or using a hard object (like one of the famous Avebury Ring's megalith's in the image below) to partially obscure the sun. As you can see, this creates a stunning sun-star effect!
A less recommended option is that you capture two frames - one normal exposure and one with your finger blocking the sun. Yes, I do mean stick your finger in front of the lens to block out the sun! Then, using photoshop, you can merge the two and mask out any flare! The trouble is that this is both laborious and prone to artefacts if, for example, you were shooting a seascape with moving waves, the merging of the two is extremely challenging. Believe me, I've tried all the tricks and some just aren't worth the hassle!


The other challenge with backlighting is the intensity of the scene. Modern cameras do have an incredible dynamic range (the ability to capture a wide range of light from pure black to white) and more often than not all the detail can be retained if good camera technique is followed. For those trickier scenarios, techniques such as HDR (High Dynamic Range - where you capture multiple "bracketed" exposures and use software to merge them all together) and my absolute go-to, ND (Neutral Density) graduated filters, act as if you put a pair of sunglasses over the brightest part of the scene, bringing the exposure back into balance, on camera, and without the need for complex post-processing.
Front Lighting
This is a type of lighting, where the sun is directly behind you, that I tend to avoid for two main reasons.
It provides a very flat light source. Shadows are near existent and there is little depth to the scene.
Secondly - your own shadow! More often than not, a front-lit scene will present a ghastly, five-legged shadow (me plus the tripod!) across the immediate foreground and, unless you're seeking Instagram fame (You can't beat a good Instagram photographer shadow, right?!), it's not really what you're looking for in a piece of art worthy of hanging on your walls!
That's not to say it should always be discounted. The image below works, in my mind. The warm, early morning light, the fact I (somehow) managed to not get my shadow in the scene and the ominous, dark clouds add the drama and depth that wouldn't have worked had it been a clear day. That's the beauty of photography though - the rules are there to be broken!

Direct Sunlight
A contentious light source, this one. Yes, I agree that the consensus is that the golden hour is best but, as I said above, the rules are there to be broken!
Why would you put that camera away if you are on a gorgeous, secluded white sand beach, or tropical setting? Sure, the shadows on objects can be intense and even harsh, blocking out the detail and textures normally seen early or later in the day are all but impossible to see. However, with the use of things like polarising filters, you can capture stunning blues and greens of crystal clear water, big skies of open landscapes and that general warm feeling of a bright, sunny day.
A few things to note are the subject matter and the use of black-and-white photography. Keep the compositions simple and the subject matter minimal. Avoid complex landscapes with cliffs, rocky mountains, buildings etc that cast those intense shadows, spoiling the detail and adding harsh contrast. Instead, stick to simple, open vistas with specific subject matter, like in the examples below. Secondly, black and white works beautifully with direct light - the strong contrast helps boost the overall image, yielding very pleasing but bold results.


Overcast Days
Overcast weather often brings frustration to landscape photographers hoping for golden-hour magic, but it also presents unique creative opportunities. Rather than seeing a dull sky as a setback, embrace the drama and mood that clouds can bring.
Heavy clouds can add texture, depth, and atmosphere to a scene. While flat, featureless skies may lack interest, dramatic storm clouds can create moody, powerful images. Long exposures can enhance movement in the sky, while black and white processing brings out tonal contrast.
Overcast skies act as a giant softbox, creating soft, even lighting that eliminates harsh shadows. This makes woodland scenes ideal, where details in tree bark, moss, and fallen leaves are beautifully illuminated. The rich greens and earthy tones appear more vibrant without the harshness of direct sunlight.

The coast can look spectacular under grey skies. Structures such as piers, groynes, and lighthouses provide strong focal points, standing out against the sea and sky. Long exposure photography can turn choppy waters into smooth, mist-like surfaces, enhancing the sense of calm or mystery.
Overcast conditions naturally lend themselves to black-and-white photography. Without the distraction of colour, compositions become about light, shadow, texture, and form. Moody skies, rough seas, and rugged landscapes all take on a timeless quality.
If wide vistas seem uninspiring, shift focus to smaller details. Wet leaves, textured rocks, patterns in tree bark, or water droplets on grass can become compelling subjects. Macro photography thrives in these conditions with the absence of strong contrast.
With low-contrast skies, keep compositions clean and simple. Strong foreground elements, such as a lone tree, a winding path, or a prominent rock formation, can help anchor the image. Negative space can add a sense of scale and atmosphere.
Overcast days can be unpredictable—rain, mist, or even a sudden break in the clouds can transform a scene. Rather than resisting the conditions, work with them. Fog softens distant elements for an ethereal effect, while shafts of sunlight breaking through can create dramatic highlights.


Reflected Lighting
Landscape photography isn’t just about chasing golden-hour sunlight—some of the most breathtaking images are captured when reflected light takes centre stage. This happens when the sun has dipped below the horizon, or when soft, high cloud scatters and reflects light across the scene. Mastering these conditions can lead to stunning, atmospheric images with a glow that feels almost otherworldly.
Some of the most magical lighting happens just before sunrise or after the sun has set. The sky holds onto soft, reflected colours, often with pinks, purples, and deep blues blending together. While many pack up after the sun disappears, this is the time to stay put. Twilight brings an ethereal quality to landscapes, with diffused light gently illuminating the scene.
Thin, high-altitude clouds act as a natural reflector, bouncing sunlight across the sky long after the sun has dipped below the horizon. The key is to study weather conditions—clouds too thick will block light entirely, but high, wispy cirrus clouds can catch and reflect warm hues, filling the sky with pastel colours. If the forecast predicts high clouds at sunset or sunrise, chances are good for an impressive post-sunset glow. The best colours often peak 10–20 minutes after the sun has set, so patience is essential.
It’s easy to fixate on the direction of the sun, but sometimes, the most interesting lighting happens behind you. As sunlight reflects off clouds, it can create unexpected colour gradients and tones across the landscape. Turning around and observing the subtle glow on mountains, trees, or water can reveal compositions you might have otherwise missed.
One of the best ways to enhance reflected light is to use water. Lakes, rivers, wet sand, and even puddles can double the effect, amplifying colours and creating symmetry in your composition. A still body of water can produce mirror-like reflections, while gentle ripples can add texture and depth to the light.
Coastal Scenes: Wet sand at low tide reflects sky colours beautifully.
Lakes & Rivers: A calm lake can create a near-perfect mirror image of the sky’s glow.
Cityscapes: Even in urban settings, reflections off wet pavement or glass buildings can create striking compositions.


Moonlight
Shooting landscapes under moonlight presents a unique challenge but also an incredible opportunity to capture scenes in a way that few people experience. The moon acts as a natural light source, casting either direct or diffused light, creating ethereal, almost dreamlike images. Mastering moonlit photography requires patience, the right conditions, and an understanding of how to work in low-light environments.
The quality of moonlight in your images depends on the moon’s phase and the presence of clouds:
Full Moon – Direct Light: A full moon on a clear night produces strong directional light, much like sunlight but softer and cooler in tone. Shadows become well-defined, and landscapes take on a silvery glow. This can work well for rugged terrain, deserts, or coastal cliffs, where strong light enhances textures.
Cloudy or Partial Moon – Diffused Light: When the moon is partially obscured by thin clouds or is in its crescent phase, the light becomes much softer and more even. This creates a more subtle, moody atmosphere, ideal for foggy woodlands, misty lakes, or long-exposure seascapes.
Moonlight transforms familiar landscapes into something otherworldly. The key is choosing subjects that either reflect light well or contrast beautifully with the night sky.
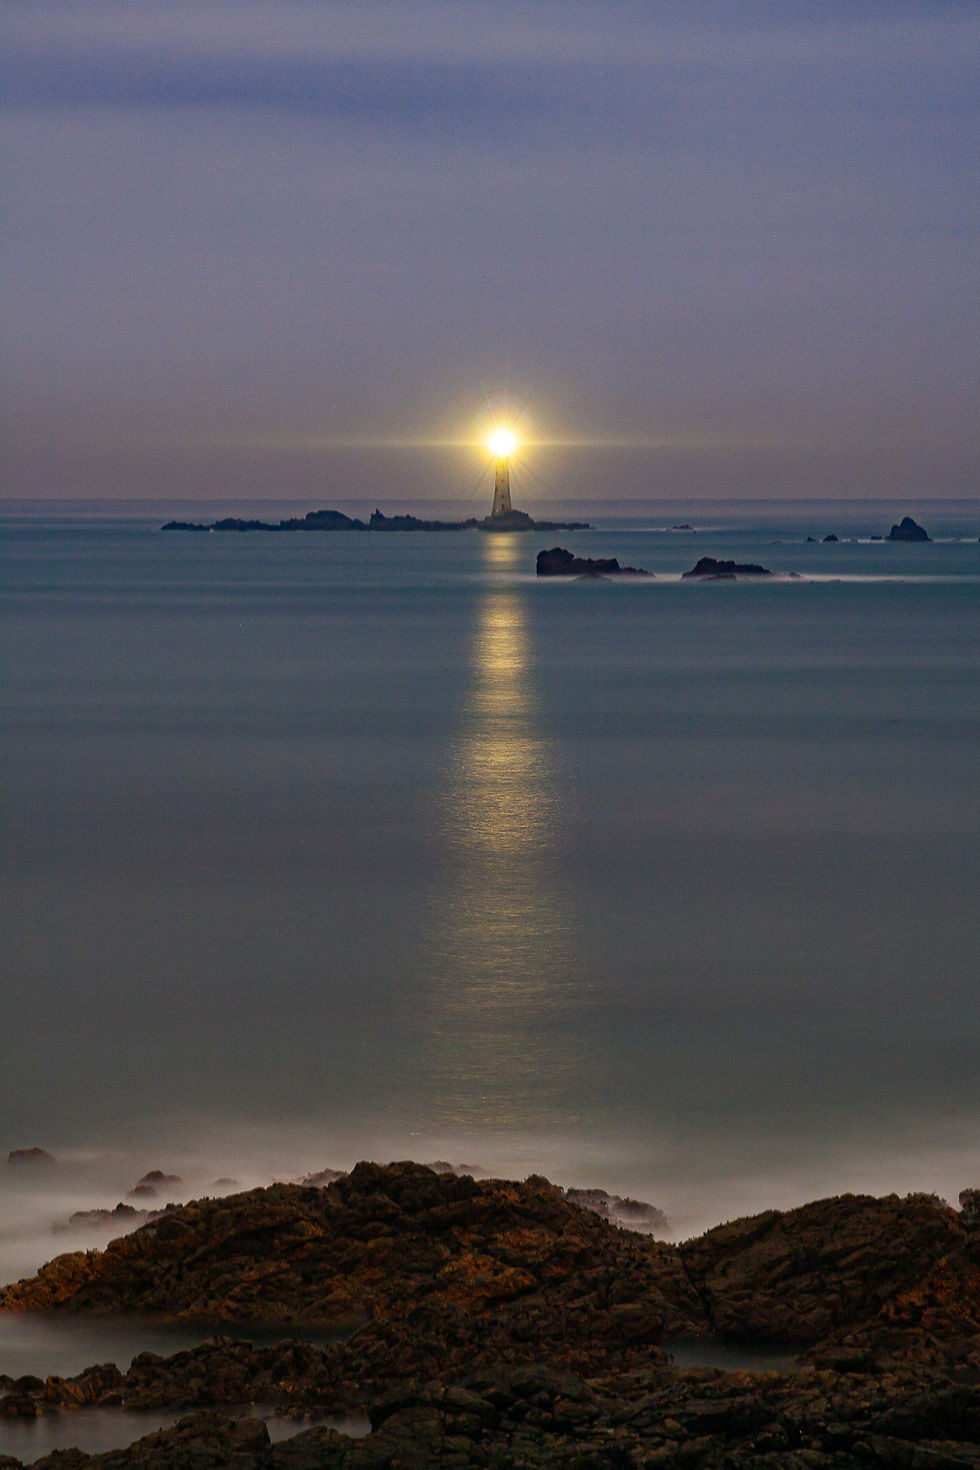
Lighthouses & Coastal Scenes – A lighthouse against a moonlit sky creates a stunning focal point. Coastal rocks, cliffs, and crashing waves add drama, especially with long exposures.
Forests & Trees – Silhouettes of trees against a moonlit sky create a mysterious atmosphere, especially with mist or fog diffusing the light.
Mountains & Deserts – Rugged landscapes take on a surreal quality under direct moonlight, with shadows adding depth and texture.
Lakes & Still Water – The reflection of the moon on water adds symmetry and tranquillity to an image, creating a perfect balance of light and shadow.
Man-Made Structures – Castles, ruins, and old barns bathed in moonlight create dramatic, moody compositions, especially when contrasted with a star-filled sky.


Conclusion
Light is the defining factor in landscape photography, shaping mood, contrast, and composition in ways that go far beyond camera settings or post-production. While golden hour side lighting often provides the most sought-after conditions, the true skill of a photographer lies in adapting to all forms of natural light. From the strong contrasts of backlighting to the soft illumination of overcast skies, and from the glowing hues of reflected light to the surreal beauty of moonlit landscapes, each scenario offers unique creative possibilities.
Instead of waiting for the "perfect" light, embrace the conditions at hand. Learn to read the sky, anticipate changes, and adjust your approach to make the most of every chance to use your camera - there is no bad light, only new opportunities!
Kommentare